P1QP Manual
Wireless enabled battery powered manometer P1QP
User manual for FW version 4.x - IoT
First steps
Turning the unit ON
When battery is inserted into the unit the device DOES NOT automatically turns itself. To turn the device on ENTER button needs to be pushed for more than 2 seconds to turn the unit ON.
The device is delivered to the customer with the Wireless option OFF. To turn the wireless radio ON the Wireless functionality has to be enabled in menu using display.
Turning the Wireless functionality ON
- Press Esc and Enter buttons simultaneously for at least 2 seconds to enter configuration menu
- Keep pressing down arrow to select Wireless menu section, press Enter
- Follow instructions on the display - see this manual section "Wireless = Setting of the sampling interval and transmit count" for detail description of parameters.
- If network connection procedure is not successful you can still keep the wireless functionality on. The unit will keep trying to connect to the network in random intervals indefinitely until successful.
Next time the battery is replaced and turned on by pressing ENTER button the device automatically enters the last Wireless state which was active before the battery replacement (e.g. ON).
Description
The device has two main display modes - "standard display mode" - this is the mode where readings from sensor are shown on the display and "configuration display mode" - which is the mode with configuration menu shown.
The device starts in "standard display mode" which shows the current reading from the sensor - see section "Standard display mode" below.
The device is switched into "configuration display mode" by pressing both the Esc and Enter keys simultaneously for at least 2 seconds. Escaping from configuration mode into standard mode is done by pressing Esc button. Pressing Esc button multiple times always leaves user in standard display mode from any screen.
Integration resources
- LoRaWAN packet format description available here.
- P1QP pressure sensor is already part of the The Things Stack codec portfolio, therefore it is not necessary to integrate the codes for P1QP into The Things Network or The Things Stack manually. See https://github.com/TheThingsNetwork/lorawan-devices/blob/master/vendor/moirelabs/p1q-codec.js
Menu map
Starting with display in OFF state
| button | mode | button | screen | button | screen |
|---|---|---|---|---|---|
| Enter | Standard display | Reading display | |||
| Up | Graph display | ||||
| Esc | back to Reading display | ||||
| Down | Press OK to power off device | ||||
| Esc or Up | back to Standard display | ||||
| Enter | Turns display off and enters low power mode | ||||
| Esc + Enter | Configuration display | ||||
| Floating point | |||||
| 1 Down | Filtration | ||||
| 2 Down | Calibration | ||||
| 3 Down | Unit | ||||
| 4 Down | Set password | ||||
| 5 Down | Power | ||||
| 6 Down | Info | ||||
| 7 Down | Wireless | ||||
| 8 Down | Contrast |
Standard display mode
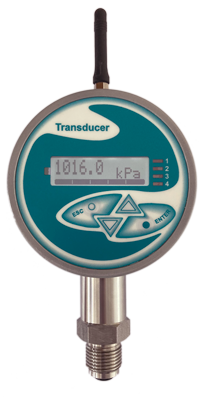
After the manometer is turned on by replacing battery or display activated by pressing Enter button (2+ seconds) the display will show the standard display design.
In standard display mode the measured information will shows on the matrix display.
Standard display mode has two screens - the main screen for showing the current reading in large digits and secondary graph screen, which shows the historical readings in a graph - to enter the graph screen press Up arrow in main screen of standard display mode.
The display will switch off after approximately 30 seconds if no button is pressed. The displays turns off to conserve battery power, but the periodic measurements will keep sending data to wireless uplink even if the display is off. This off timeout can be changed in configuration mode.
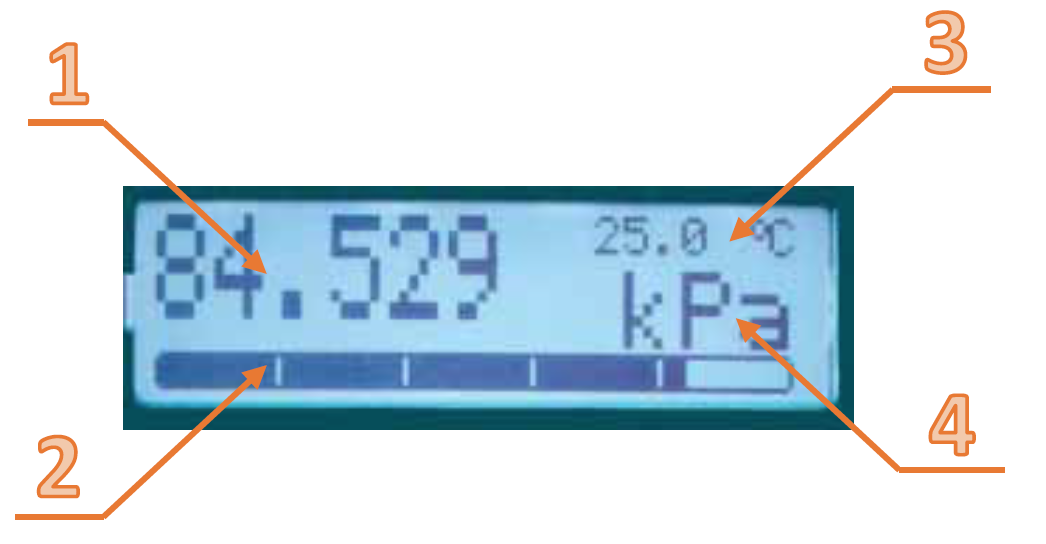
Picture shows main view of standard display mode "Reading display" screen.
- Primary measurement reading
- Primary measurement line bar indicating measurement range
- Secondary unit indicative measurement (not available on all models)
- Primary measurement unit
Configuration display mode
To enter the "configuration display mode" press Esc + Enter together in standard display mode or when display is completely off. This enters the configuration mode - "Floating point" text will be the first line in the menu to see when this mode is entered.
Floating point = Set the number of numbers after decimal point on display
Enter menu (Press Esc and Enter for at least 2 seconds), scroll through the menu using arrow buttons. Select "Floating point" and press Enter. Using arrows select the number of digits (for example: 0 -> 34 kPa, 1 -> 34.4 kPa, 2 -> 34.43 kPa). Confirm selection pressing Enter. Return to display mode pressing Esc button.
If there is not enough room on the display to show number of selected decimal digits the floating point number will be will be shortened to maximum length possible.
Filtration = Set filtration parameters
Filtration functionality normalizes value shown on the display in a way to transform larger value changes into multiple smaller steps and display updates. This effectively means that with higher filtration effect very small changes of the measured value do not update the display at all and large changes update display in smaller increments prolonging the time showing the real measurement.
By default the filtration is set to "1", which means no filtration is applied to the values. By lowering the filtration option (for example to 0.3) it will take longer time to reflect the reading on the display, but the steps will be more readable by the person reading of the display value.
It is not recommended to set filtering to very high filtration level (very low setting value such as 0.01) as this will, in case of large reading changes, make the display to show readings with a very large time lag.
Calibration
Enter the "Calibration" section using the display of the manometer.
The default password is set to "1111". Press enter.
With up and down buttons select the desired calibration value to set:
- Minimum = calibration of the minimal range value
- Maximum = calibration of maximum range value
- Offset = set the manometer offset
- Default = set the calibration as done during manufacture
- Autozero = set the Autozero function ON or OFF - see below for more information
Offset: Use this function when you are only able to calibrate one point in the whole measured range - for example "0" by closing the valve on the measured piping, setting the offset for achieving reading of "0". All the measurements in range will then be offset by this Offset value.
Setting the minimum and maximum value
Setting the minimum value:
- Connect the manometer to the known precision source of the minimum pressure this manometer is physically able to measure (see label).
- Go to calibration menu: Calibration -> Minimum
- Using the up and down arrows select the current real known reference pressure value
- Confirm the selection by pressing Enter
Setting the maximum value:
To set the maximum value connect the manometer to the source of known reference maximum pressure range and repeat the same process as for minimum value, but select Calibration -> Maximum menu item instead.
Please note, that each individual manometer is, additionally to this calibration, internally calibrated to compensate for temperature changes and non-linearity during manufacture. Also note, that each user of the measurement equipment might have different requirements as to how often and what procedure must be taken to calibrate the equipment to desired accuracy levels. Please consult datasheet to make informed decision on how often to calibrate the sensor.
Description of Autozero function
"Autozero" function serves for ignoring very small pressure changes at pressure close to 0 on the display. It is often undesirable to show values on the display, which are very close to zero, especially when the resolution of the measurement on the display exceeds the manometer accuracy. For example if the manometer measurement accuracy is 0.25% the Autozero value shall be set to 0.025% to ignore changes in pressure close to zero, which are smaller than equipment accuracy. This avoids ambiguity in readings smaller than precision of equipment (but only for values very close to zero).
It is highly advisable to temporarily switch off this function before calibration.
By default Autozero functionality is turned ON for underpressure/overpressure configurations of units and set to 1/10 of measurement precision. It is turned OFF for absolute configurations of units.
Unit = Set the reading unit on display
This procedure changes the type of unit of the reading shown on the display. Changing this setting DOES NOT affect the unit used in wireless uplink packets! Changing the unit in wireless packet is not supported as of now.
Selection of units to choose from:
- psi - pound-force per square inch
- mmHg - millimetre of mercury
- torr - one torr = 101325 / 760 ~= 133.32 Pa
- atm - one atm = 101325 Pa
- mbar - millibar = hPa = 100 Pa
- bar = 100 kPa
- MPa - Megapascal = 1000000 Pa
- kPa - Kilopascal = 1000 Pa
- hPa - 1 hPa = 100 Pa
- Pa - pascal - 1 Pa
- m - meter - only used for measuring liquid level - must be used in combination with "Density" setting
Configuration procedure:
- Enter configuration menu by pressing Esc and Enter at the same time. Scroll to "Unit" submenu, press Enter.
- Change the display unit by pressing the arrows.
- Press Enter to select the desired unit.
- Press Esc to return to standard display mode.
Set password = Changing the configuration password
Password is a 4-digit code protecting device from configuration changes. To change the default password of "1111" follow the procedure below:
- Enter configuration menu (press Esc and Enter together for 2 seconds).
- Scroll to "Set password" submenu, select by pressing Enter.
- On request ("Password:") select a new password by pressing up and down arrows. Password can only be numeric and only 4 digits long.
- Confirm the setting by pressing Enter
- Return to display mode by pressing Esc
Power = Setting display and display illumination off time
Using the display has a very high impact on battery life, therefore it is recommended to keep the display off for as much time as possible.. The setting is separated into two options - how long to keep the display on and how long to keep the display illumination on after the device is put into standard display mode by pressing Enter button in normal operating condition.
Even the display is off the unit periodically measures and sends values over wireless network. Not seeing the values on display does not mean the wireless functionality is off.
By default both - the display off and illumination off (Led time) time are set to 30 seconds.
Setting the display off time
- Enter configuration menu by pressing Esc and Enter at the same time for 2 seconds
- Scroll using arrow keys to "Off time", press Enter to select option
- Select desired display off time value using arrow keys (values in seconds - max. 59 seconds - or "Still on" )
- Confirm selection by pressing Enter
- Press Esc to return to standard display mode
Setting the display illumination off time
- Enter configuration menu by pressing Esc and Enter at the same time for 2 seconds
- Scroll using arrow keys to "Led time", press Enter to select option
- Select desired display illumination off value using arrow keys (values in seconds - max. 59 seconds - or "Still on" or "Still off")
- Confirm selection by pressing Enter
- Press Esc to return to standard display mode
Info = Entering device information screen
- Enter configuration menu pressing Esc + Enter at the same time for more than 2 seconds
- Scroll using arrow keys to "Info" submenu, confirm selection by pressing Enter
- Device and firmware information will show on display, scroll through the displayed information using arrow keys
- Press Esc several times to return to normal display mode
Wireless = Setting of the sampling interval and transmit count
Two intervals are recognized by the device - sampling interval and transmit count. Sampling interval indicates how often to make a reading of the primary measurement unit. The transmit count indicates how many measurements are made before the device transmits measurement packet. For example measurement interval of 30 seconds and transmit count of 10 means, that sampling is done every 30 seconds and after 10 samples (300 seconds) the data are transmitted using wireless network. The transmitted packet now contains values for minimum, maximum, average and last measured value for the last 10 samples.
Setting records per packet and sampling interval
Starting from display OFF:
- Turn on display: Long press Enter
- Enter menu: Press both ESC and Enter at the same time
- Select "Wireless" submenu, press Enter
- Enter "Records per packet" number by pressing ⇧ or ⇩ and then press Enter - (this would be "10" as per example above)
- You will now start entering sampling interval starting with hours, then minutes and seconds.
- Select intervals hour setting (or 0 for less than hour-long interval) with ⇧ and ⇩, then press Enter
- Select intervals minute setting (or 0 for less than minute-long interval), then press Enter
- Select intervals seconds setting (no less than 30s), then press Enter
- After the selection the device will start connection procedure to desired network.
If the manometer fails to establish the connection to the network you will be presented with an option to either turn the Wireless functionality OFF or keep the Wireless functionality ON in which case the device will keep trying to connect to the network until successful.
When Wireless functionality is OFF the manometer still works as a measurement instrument, but without the uplink functionality.
Contrast = Display contrast configuration
- Enter configuration menu pressing Esc + Enter at the same time for more than 2 seconds
- Scroll using arrow keys to "Contrast" submenu, confirm selection by pressing Enter
- Select desired display contrast using arrow keys. Values range is 15 to 55. Do not set the value too low or too high as the display might become difficult to use and changing the contrast value might become impossible.
- Press Esc several times to return to normal display mode
Display warning messages
"LOW BATTERY" message
When battery voltage drops to a very low level the message "Low battery" will be shown on the display. When this happens the measurements and transmit of data to wireless network stops. The battery must be replaced to resume the full functionality of the device.
"EXTREME" message
If the measured value exceeds the range of the sensor or the sensor is damaged the notice EXTREME will show on display. It is recommended to check whether the unit is designed for required measurement range. If the real pressure is within the measurement range of the device and EXTREME shows on display the device needs servicing.
Control LED
Some device versions contain a blue LED located next to displays right top corner. This led blinks once when new Wireless transmission occurs.
Battery level information
| Packet value | Battery voltage | |
| 255 (upper limit) | more than 3.6V | |
| 248 | 3.5V | |
| 240 | 3.4V | |
| 233 | 3.3V | |
| 226 | 3.2V | |
| 220 | 3.1V | |
| 212 | 3.0V | |
| 205 | 2.9V | |
| 198 | 2.8V | Do not use rechargeable Li-Ion battery below this voltage |
| less than 185 | less than 2.7V Do not use rechargeable NiMH battery below this voltage |
Support
For support please contact your distributor or manufacturer directly via www.moirelabs.com